Account Approvals
Introduction
You can require that Cart Accounts be approved before they can be used to make Purchases. Approvals are done by Coordinators, who have special access to tools and data via a Dashboard. Coordinators are part of Organizations, so Coordinators are responsible for only approving Accounts that are affiliated with their Organization. Organizations can also have Departments, which allows for a greater level of granularity, as a Coordinator can be responsible for approving Accounts that are just part his Department, instead of approving Accounts for the entire Organization.
Organizations have Landing Pages, and the affiliation between the Cart Account and the Organization can be determined by the registration originating from that page. Also, the affiliation between the Cart Account and the Organization can be defined via form questions that are asked when the Account is created.
Note: The setup for this feature is involved. If you are unfamiliar with Organization Mode, or if you have any questions about setting up Account Approvals, please contact us support@configio.com, and we would be happy to assist.
Getting Started
There are a number of Configurations that are relevant to the feature. Start by logging into the Administrative side of your database and navigating to Settings --> Setup --> Configuration. Search for "Organization". Turn Organization Mode to ON, and determine how Accounts and Organizations become affiliated.
Affiliation Options
You have options regarding how the System creates the affiliations between Cart Accounts and Organizations:
- Determine the Org from the Cart Landing Page entrypoint: the System will determine that Account is affiliated with that Org via the context of the registration coming from the Cart Landing Page. If the User registers for an Account via another page, eg the Main Product List page, then there will be no affiliation.
- Ask for the Org on the Account Registration Form: the System will simply always ask for the User's Organization via an question on the Account Registration Form
- Determine the Org from the Cart Landing Page entrypoint, otherwise, ask for it: the System will determine the affiliation if the registration is coming from the Cart Landing Page, otherwise it will ask for it as a backup.
Note: there is also an option to "Associate the Org via the Email Domain". This is always the last fallback for the other options. That is, if affiliation fails via the configured methodology, then the System will try to affiliate by matching the domain of the Organization with the domain of the User's email address.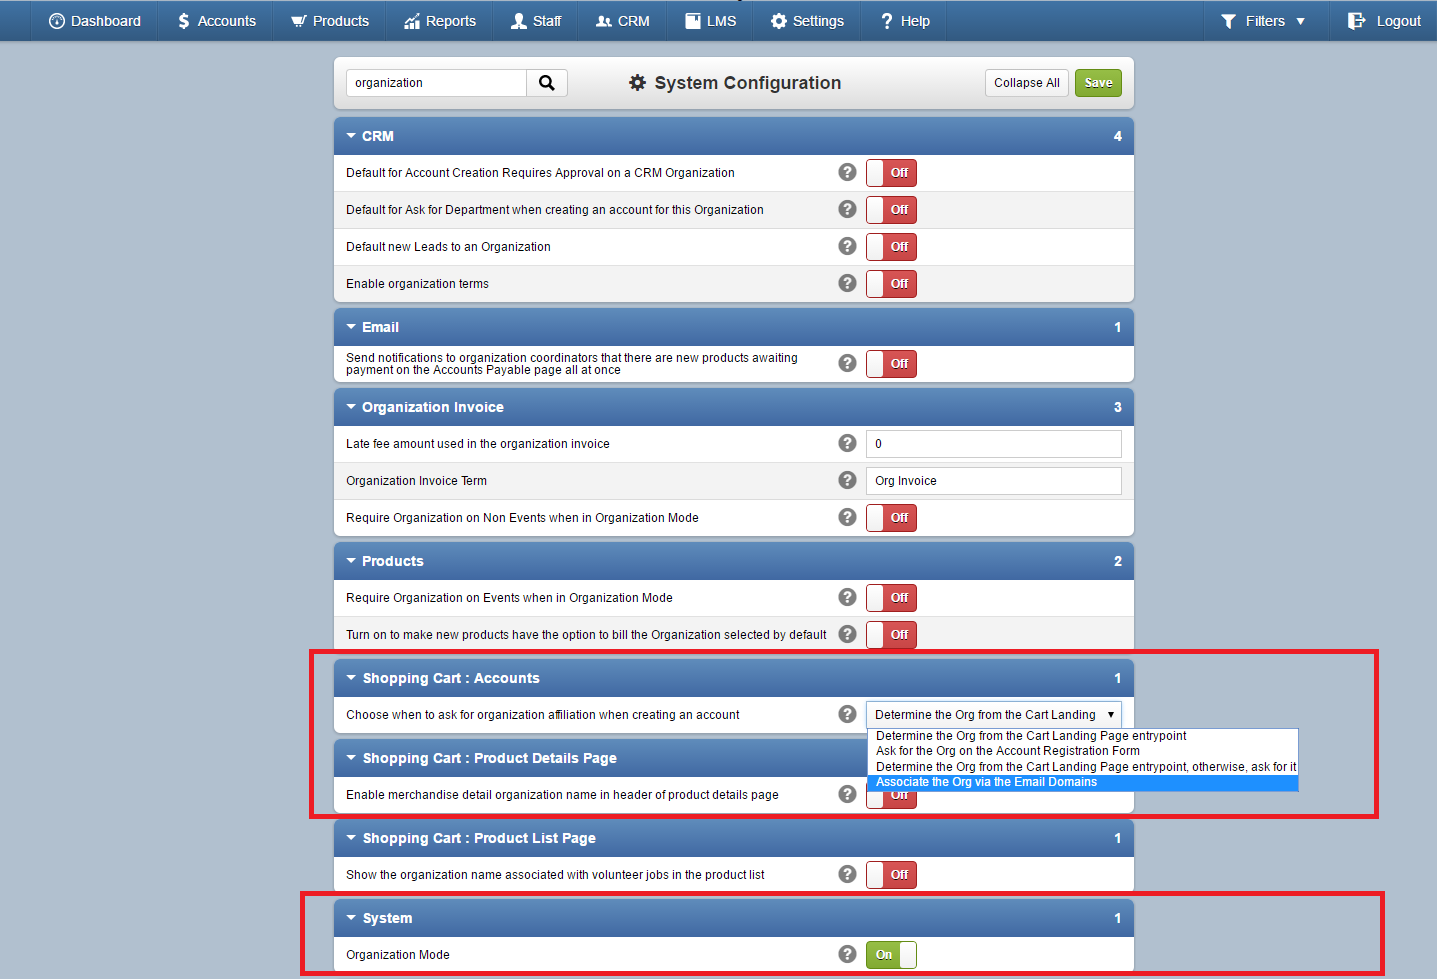
Other Relevant Configurations
There are a few other relevant System Configurations to take a look at. Search for "approv" to find them.
- Default for Account Creation Requires Approval on a CRM Organization: turn ON to have the checkbox "Account Creation Requires Approval" be ticked by default for new Organizations.
- Message to display when an account is pending creation approval: this message is shown to Users on the Cart Landing Page when they login prior to their Account being approved.
-
Term you use to describe a person who can approve product purchases and account creation: this term is used when referencing the person who can approve accounts.
CRM Integration -- Creating Organizations
Adding Domains to an Organization
Adding Departments to an Organization
CRM Integration -- Creating Coordinators for the Organization
Creating a CRM Contact
- Updating the Password for them: The benefit of doing it for them is that it will save them a step. Do this by going the Accounts section of the Admin, finding the Account, and editing it with a new password. You can then give them their Shopping Cart / Coordinator Dashboard credentials -- the Username is their email address from when the CRM Contact was created, and the password is whatever you set it to. The Coordinator can then login using those credentials, access their Dashboard, and (if desired) personalize their password.
- Letting them update their Password: The benefit of letting them update their password, is that they won't get an Account Password Update email message from a system that they (perhaps) are unfamiliar with with. There is a type of email message titled Coordinator Account Creation. You can create this message, and include the "Account Link" Operator that will allow them to update their password.
CRM Integration -- Setting-up the Cart Landing Page
Account Creation Controls
Header and Footer Text
Email Message
- Account Approval Request: this message is sent to the Approver when a User creates an Account.
- Account Approval Notification: this message is sent to the User if the Account is approved.
- Account Denial Notification: this message is sent to the User if the Account is denied.
The Cart Account User's Experience
The Coordinator's Experience
Related Articles
Account Groups Overview
Topics Covered: Overview Creating Your First Group Editing a Group Finding the Account Groups Page Viewing the Account Groups Page Viewing a Group The Account Group Header Content Block The Account Group Header - The Email Group Members Button The ...Account Introduction
The Account Screen gives you a number of tools you can use to get your work done and to assist your customers. Note: You can look up an Account by the Account holder's First Name or Last Name by typing it into the search field: Click on “Participant” ...Account Introduction
The Account Screen gives you a number of tools you can use to get your work done and to assist your customers. Note: You can look up an Account by the Account holder's First Name or Last Name by typing it into the search field: Click on “Participant” ...Account Filters
Example: The account filters allow you to sort all accounts by: Account - This is a targeted keyword search by First Name and/or Last Name. Guest - If guest checkout is enabled this will search by all guest that have created an account. Participant - ...Create New Account
Example: You would like to create an account on behalf of a customer. How To: To manually create an account, navigate to Accounts located at the top left of the screen. On this screen you have two options: Search or Create New Account. Click the ...